Faculty members or instructors that are configured to complete approvals must complete all approvals.
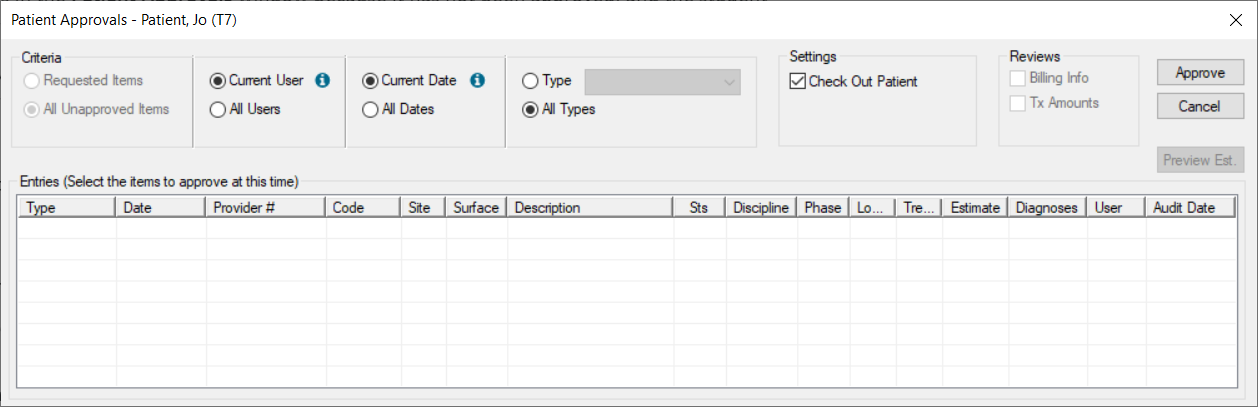
- From the status bar, click the teal patient chart number to display the Patient Approvals window.
Important: The Criteria filters default differently depending how the student provider is configured and you may need to modify the filters. For student providers that use approval requests, the Requested Items and All Unapproved Items radio buttons are enabled.
- To identify and select the items you want to approve, complete the following:
-
(Optional) Modify the filters as necessary.
Important: The filters can have different default behavior depending on how the student provider is set up for approval requests.
Filter fields
|
Requested Items / All Unapproved Items
|
If enabled, select a radio button as necessary.
|
|
Current User / All Users
|
If enabled, select a radio button as necessary:
- Current User: Displays items that were entered by/for the current user and require approval.
- All Users: Displays items that require approval for all users.
|
|
Current Date / All Dates
|
If enabled, select a radio button as necessary:
- Current Date: Displays items that require approval and have today’s date listed under the Audit Date column.
- All Dates: Displays items that require approval from all dates.
|
|
Type / All Types
|
Select a radio button as necessary:
- Type: Enables the drop-down list to select the type of records to display.
- All Types: Display items that require approval, regardless of the type.
|
- Under the Entries list, select the item(s) you want to approve.
Tip: Press Ctrl to select multiple records.
Note: The Status column indicates an item’s status and whether an item has been edited or deleted.
Example: A treatment can have a P/I/C status and may also display a (D) if it was deleted or an (E) if it was edited.
-
Modify the Settings and Reviews checkboxes as necessary.
Checkbox fields
|
Check Out Patient
|
Select this checkbox to have the patient be checked out when the approval process completes.
|
|
Enter Evaluation
|
Select the checkbox to add an evaluation after the treatment record(s) are approved.
Note: This checkbox only displays if configured from the Evaluation Setup window > Optionally evaluate on Patient Approvals field.
|
|
Billing Info
|
This checkbox is enabled if one or more P/I/C treatment records are selected in the entries list.
Note: The checkbox is disabled if the treatment is set to (E) or (D) status.
Select this checkbox to display the Review Billing Information window for treatments being approved.
Note: This checkbox is selected by default if the Review Billing Info. in Patient Approvals (default) checkbox is selected in the Patient Options window.
|
|
Tx Amounts
|
This checkbox is enabled if one or more P/I/C treatment records are selected in the entries list.
Select this checkbox to display the Treatment Split window for each treatment being approved.
|
- (Optional) Click Preview Est. to populate the Estimate column for any treatments.
Note: This checkbox only displays if configured from Maintenance > System > Station Options > Patients > Patient Approvals > PtApprovalCalcTotals.
- Click Approve.
axiUm performs a security check and, depending which location you are approving from, one of the following occurs:
- If approving from a student provider’s workstation, the User Authentication window displays. When prompted, enter your credentials and click OK.
- If approving from your faculty workstation, the approval process begins without an authentication window.
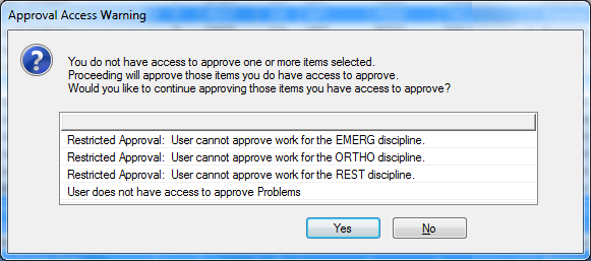
Note: An Approval Access Warning window displays if you do not have authorization for all item type(s) selected. If prompted, click Yes to continue with the approvals you are authorized to approve or click No to close the window and stop the approvals process for all items.
After you authenticate successfully, the approval process for the selected item(s) begins and occurs in the order the items are displayed in the Patient Approvals window.
Note: axiUm performs checks according to the item type. If triggered, any error/warning messages related to the item type may display.
As the approvals process continues, one of the following occurs for each selected item:
- For items that have an approval window, the window displays, allowing you to review the item and give, deny, or cancel approval.
Note: If you cancel approval for an item, it remains in the Patient Approvals window.
Important: If you cancel the approval process and there are remaining selected items that are unapproved, a message displays, asking you to confirm whether approval process should be stopped completely or should carry on with remaining items.
- For items without an approval window, the item is approved and removed from the Patient Approvals window.
For more information about approving each item type, see the correct section. The item types include: